
Yeast Management in Homebrewing – A Guided Approach
In the world of homebrewing, yeast management is a golden ticket to achieving that perfect batch of brew. Picture yourself in your makeshift brewery at home, the aroma of malt swirling in the air, and at the heart of this grand production is the microscopic yet mighty ingredient: yeast. It’s like the director of a blockbuster movie, setting the stage for a flavorful and aromatic experience that awaits you.
Unearthing the Secrets of Handling Yeast
Now, let’s embark on a tantalizing journey where we uncover the secrets of handling yeast with precision. If you’ve ever baked bread, you’re somewhat familiar with the yeast’s role. But in brewing, it’s a different ball game. A good start is to ensure the yeast’s viability and vitality. Freshness is key, and a discerning homebrewer knows that the fresher the yeast, the better the results. All yeast packets whether dry or liquid will have an expiration date. Also, be careful buying liquid yeast if you get it shipped during the summer. There’s a good chance the yeast might die in transit due to the heat.
When handling yeast, cleanliness is paramount. Your home brewery should emulate a sanctuary where only the yeast can flourish, devoid of contaminants. It’s not uncommon to see seasoned homebrewers donning gloves and spaying all surfaces with sanitizer, a gentle reminder that we are handling a living organism that demands respect and purity.
Storing Your Precious Yeast
Shifting gears to storage, one might wonder, what is the ideal home for our yeast? An environment that echoes stability, cool temperatures, and is devoid of fluctuations is what we seek. Refrigeration seems to be a unanimous choice amongst veterans in the field. It’s like a cozy retreat for the yeast, where it maintains its vigor, awaiting its grand performance in the brew kettle.
But don’t just tuck it in any corner of the fridge. Find a spot where the temperature is steady, avoiding the areas close to the freezer. You wouldn’t want to send it into shock with erratic temperature swings, would you? Packaging also speaks volumes. An air-tight container is non-negotiable, creating a fortress that shields the yeast from moisture and unwanted invaders.
The Circle of Life – Reusing Yeast
Here we approach a stage that mirrors a circle of life, the reuse of yeast. As a frugal homebrewer, reusing yeast is a practice that marries the economy with quality. It’s like meeting an old friend, where you’ve already established a camaraderie, and you know exactly what to expect.
However, a word of caution here. Reusing yeast (washing yeast) is an art and not a venture to be taken lightly. One needs to be attuned to the yeast’s condition, assessing its health and vitality before ushering it into a new batch of brew. A smart practice is to reuse yeast within a timeframe that doesn’t compromise its vitality, usually within a week or two.
Here’s a cool video that goes over yeast washing:
Tips and Tricks for Novice Homebrewers
To the novice homebrewers who are stepping into this vibrant arena, here are a few pointers that might come in handy. First and foremost, get acquainted with the yeast. Understand its characteristics, its likes and dislikes. Just like you would nurture a plant, nurture your yeast with the same affection and attention to detail.
Next, don’t shy away from experimenting. While respecting the age-old practices, bring in a touch of modernity, and a hint of innovation. Maybe you could play around with the fermentation temperatures, or experiment with different strains of yeast, painting your canvas with hues of creativity that define your unique brewing style.
And remember, patience is a virtue in the world of brewing. Just like a good story unfolds gradually, let your brew take its time, allowing the yeast to work its magic, to craft a potion that’s nothing short of perfection.
As we tread this path together, let’s remind ourselves that brewing is not just a hobby, it’s a journey of discovery, a journey where each batch tells a story, a testimony to the brewer’s dedication and the mystical world of yeast that lies at its heart.
The Unsung Hero – Yeast Strains Explained
Let’s delve deeper into the heart of yeast management: understanding the various yeast strains available for homebrewing. A myriad of options awaits the budding brewmaster, each promising to bestow unique characteristics upon your brew. It’s akin to choosing the protagonist for your story, where each yeast strain brings its own flavor, setting the stage for a captivating narrative in the form of a delightful beverage.
Selecting the right yeast strain is akin to choosing the best-suited actor for a role. Consider the characteristics of the beer you aim to create. Are you envisioning a crisp lager or perhaps a fruity ale? Each yeast strain will impart a different personality to your brew, weaving a complex yet harmonious tapestry of flavors and aromas.
A Stitch in Time – Common Problems and Solutions
As we meander further into our yeast management journey, it is only prudent to anticipate potential hiccups. Like any riveting plot, brewing comes with its own set of challenges and roadblocks. Let us navigate through the most common problems faced in yeast management, providing solutions that guide you back to the path of brewing success.
Often, a lingering issue is a stuck fermentation, a scenario where the yeast seems to have taken an unplanned hiatus, leaving your brew in a state of limbo. This could be due to various reasons such as inadequate nutrients or a sudden drop in temperature. Two of the most frequent causes are a lack of nutrition and a high alcohol content. The solution lies in gently rousing the yeast from its slumber, perhaps with a gentle stir, or by adjusting the temperature to a higher range.
Expert Advice – Tips to Enhance Yeast Viability
Embarking further, let’s arm ourselves with tips that can potentially elevate our brewing game. Think of this as garnering pearls of wisdom from seasoned brewers who have trodden this path before us. One such golden tip is to ensure that the wort, the sweet liquid extracted from the malted barley, is adequately aerated before pitching the yeast. This simple step ensures that the yeast has a sufficient oxygen supply to commence a healthy fermentation process.
Unveiling the Art of Oxygenating Wort
In the unfolding narrative of homebrewing, oxygenating the wort emerges as a chapter filled with both science and a sprinkle of magic. This process, much like a pivotal plot twist in a gripping novel, holds the power to steer the story in a promising direction, setting the stage for yeast to thrive and work its fermentative wonders.
For a moment, visualize yourself as a dedicated gardener, ensuring that your soil is rich and fertile, ready to nurture the seeds to sprout into vibrant plants. Similarly, oxygenating the wort is akin to preparing a fertile ground where yeast, our microscopic heroes, can flourish and multiply, eventually leading to a successful fermentation process.
Before we immerse ourselves further, let’s understand what wort is. Wort is the liquid extracted from the mashing process during brewing. It contains the sugars, the most important nutrients needed by the yeast to produce alcohol and carbon dioxide. The role of oxygen here is somewhat of a nurturing agent, a catalyst that encourages healthy yeast growth.
A Breath of Fresh Air – Why Oxygen is Vital
So why is oxygen so crucial at this stage? You see, yeast needs oxygen to synthesize sterols and fatty acids, components that are vital for the growth and reproduction of yeast cells. It’s an initial burst of energy that aids in building healthy cell membranes, which in turn are better equipped to manage the stressful environment of fermentation.
Imagine this as a motivational pep talk before the big game, gearing up the yeast cells to perform at their optimum level. This initial oxygen boost is critical because, during the fermentation process, the environment becomes anaerobic, and oxygen is viewed as an unwanted guest in the later stages.
Techniques to Infuse Oxygen
When it comes to the actual process of oxygenating the wort, the techniques are diverse. It could be as simple as shaking the fermenter vigorously for a few minutes, a method that is not only efficient but also requires no additional equipment. Imagine a vigorous dance, where the wort swirls and twirls, embracing oxygen in a joyful waltz.
For those who prefer a more sophisticated approach, oxygenation stones paired with an oxygen tank or an air pump can be used. This method allows a fine stream of oxygen bubbles to permeate through the wort, ensuring a more uniform and controlled oxygenation process. It’s a scene of harmony and synchronization, where technology meets tradition in a beautiful confluence.
Stepping into a Brewer’s Shoes – Practical Tips
If you are stepping into the brewer’s shoes for the first time, it might feel like you are venturing into unknown territory. But fear not, for this journey is sprinkled with learning and delightful discoveries. Start with simpler methods, perhaps using a sanitized spoon to stir the wort vigorously, creating a whirlpool effect that introduces sufficient oxygen to the mixture.
As you advance in your brewing endeavors, you might find yourself experimenting with various oxygenation techniques, finding the one that resonates with your brewing style. It’s a personal journey, a path where each brewer finds their rhythm and style, crafting beers that are a reflection of their personality and passion.
Remember, the goal here is to create a nurturing environment for the yeast, a stage where they can shine as the true stars of the brewing saga, crafting a brew that is rich in flavors and aromas, a true testament to the brewer’s skill and dedication.
Additionally, investing time in creating a yeast starter, a small fermentation that’s started a few days before brew day, can be a game-changer. It’s like a prelude to the main event, preparing the yeast for the grand role it’s about to play in your brewing story.
Embarking on the Yeast Starter Adventure
In the fascinating journey of homebrewing, creating a yeast starter stands as a milestone where the brewer dons the hat of a nurturer, fostering a vibrant and robust yeast culture that is all set to breathe life into the wort. This step, though sometimes skipped by novices, is a secret held dear by experienced brewers to ensure a successful fermentation process. It’s a prelude to the symphony that unfolds in the fermenter, a sneak peek into the delightful brew that is about to take shape.
Yeast Starters: A Brief Introduction
In essence, a yeast starter is a concoction created to propagate yeast cells, encouraging them to multiply to the desired quantity before they are introduced to the wort. It is like a training ground, a place where yeast cells are groomed and prepared for the pivotal role they are about to play in brewing your delectable beer.
At this juncture, it’s important to note the significant benefits of using a yeast starter in homebrewing. First and foremost, it helps in achieving a healthy yeast population, which is vital for vigorous fermentation. It’s like gathering a robust and dynamic team, all geared up to work harmoniously towards crafting a masterpiece, your very own homebrewed beer.
A Step-by-Step Journey to Creating a Yeast Starter
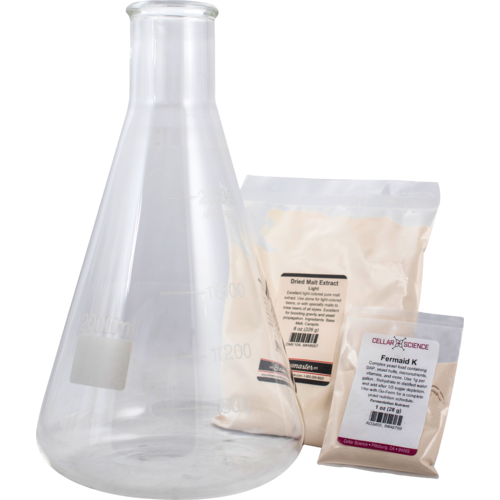
Creating a yeast starter begins with gathering a few essential ingredients and equipment. At the heart of it, all you need is some dried malt extract, water, and the yeast strain you intend to use for your brew. The equipment includes a flask or a jar to foster the starter and a stir plate, which though not mandatory, aids in keeping the yeast in suspension and promoting growth.
Here’s an example of a yeast starter 5-gallon ale batch:
For preparing a yeast starter for a 5-gallon ale batch, here’s a combined overview of the ingredients and the desired gravity:
Ingredients:
- Dry Malt Extract (DME): About 100 grams (approximately 1/2 cup). This is the sugar source for the yeast and creates a mini-wort environment.
- Water: Around 1 liter (approximately 1 quart). This acts as the solvent for the DME.
- Yeast: A suitable ale yeast strain, according to your beer recipe.
- Sanitizer: Essential for sterilizing all equipment involved in the process to prevent contamination.
Gravity of the Wort:
- The target gravity for the yeast starter wort should be in the range of 1.036 to 1.040. This specific gravity is ideal as it provides the yeast with sufficient sugar for growth without causing stress.
- To achieve this gravity, dissolve the 100 grams of DME in 1 liter of boiling water. After boiling for a few minutes to sterilize the mixture, cool it down to yeast pitching temperature (usually around 20-25°C or 68-77°F) before adding the yeast.
This gravity range and ingredient proportion create a conducive environment for yeast propagation, ensuring they are healthy and active for effective fermentation in your main 5-gallon ale batch. Remember, the quality of fermentation in your final brew heavily depends on the health and quantity of yeast, making the starter step crucial in brewing.
The Final Act – Pitching the Yeast Starter
As the yeast starter reaches its crescendo, it’s time for the final act, pitching it into the main batch of wort. This moment is akin to unveiling a masterpiece, a moment where preparation meets opportunity, setting the stage for a successful fermentation process, and eventually, a delightful brew that echoes the care and skill infused in its creation.
Fermentation Chamber – Your Very Own Brewing Sanctuary
Picture this: You are the director of a grand theatre production, and the fermentation chamber is your stage, an entity that holds the essence of your performance, safeguarding the intricate processes that breathe life into your brewing narrative. This sacred space is where the yeast, your microscopic performers, exhibit their talent, translating sugars into alcohol, and creating a symphony of flavors and aromas that define your homebrew.
Let’s take a moment to fully appreciate the pivotal role a fermentation chamber plays in the brewing process. Like a nurturing sanctuary, it provides the ideal environment for the yeast to flourish and carry out its fermentative magic, undisturbed and unhurried.
Delving Deeper – Understanding the Role of a Fermentation Chamber
To truly grasp the essence of a fermentation chamber, we must first understand the importance of temperature control during the fermentation process. Temperature, in this context, holds the reins, guiding the yeast in its performance. Too cold, and the yeast may become sluggish, slowing down the fermentation process; too hot, and it may become overly active, leading to unwanted flavors and aromas.
Herein lies the magic of a fermentation chamber. It serves as a haven where the temperature is meticulously controlled, ensuring that the yeast can work at its optimum pace, creating a brew that is balanced and harmonious, a true reflection of the brewer’s vision and skill.

Building Your Fermentation Sanctuary
Stepping into the world of homebrewing, you might find yourself contemplating the creation of your fermentation chamber, a space that mirrors your brewing philosophy and style. Well, the good news is, that building a fermentation chamber can be as simplistic or as elaborate as you wish.
For those who are just beginning their brewing journey, a simple setup involving a cool, dark corner in your home might suffice. It’s like finding a quiet nook to read a beloved novel, a place that offers solace and the perfect ambiance to dive into the pages of a brewing story.
However, as you delve deeper, you might be inspired to craft a more sophisticated setup. This could involve a dedicated refrigerator fitted with a temperature controller, and a sanctuary that offers the perfect environment for your yeast to work its magic. Imagine walking into a studio equipped with state-of-the-art technology, ready to craft a masterpiece that resonates with your audience.
Fine-Tuning – Tips to Enhance Your Fermentation Chamber
As you journey further, you might find yourself engrossed in fine-tuning your fermentation chamber, tweaking elements here and there to enhance its efficiency. This journey is akin to an artist finding the perfect hue or a writer crafting a sentence that resonates deeply with the reader.
Remember, the key here is to create an environment that encourages a healthy and vibrant fermentation process. It’s a nurturing space, a haven where the vibrant community of yeast cells can work harmoniously, crafting a brew that is a delightful blend of art and science.
Journey to Mastery – Adapting and Learning
As we come closer to the culmination of our journey, it’s vital to note that mastery in yeast management is a gradual process. It’s a continuous learning curve, where each brewing session offers a new lesson, and a fresh perspective. It’s an environment where both success and failure are welcomed, for they offer the richest grounds for learning.
This dynamic journey encourages adaptability. It nudges you to be a keen observer, to understand the nuanced language of yeast, and to respond with wisdom and agility. As you forge ahead, remember that the world of brewing is vast and generous, always offering opportunities to hone your skills and refine your craft.
To the Future – A Brewmaster in the Making
We stand at a threshold where the past meets the future, where the knowledge gathered paves the way for fresh adventures. As a budding brewmaster, this journey is your canvas, a space to paint your brewing tales with strokes of passion, dedication, and a touch of science.
Each batch you craft is a testimony to the symbiotic relationship with yeast, a celebration of this wonderful journey into the world of homebrewing. As you stand amidst the bubbling fermenters and the aroma of fresh brews, remember that this journey is yours to cherish, a beautiful blend of science and art, tradition and innovation, complexity and simplicity.
Editor note: Update on 12/10/23
© 2011-2023 by Brew.info. All rights reserved. No part of this document may be reproduced or transmitted in any form or by any means, electronic, mechanical, photocopying, recording, or otherwise, without prior written permission of Brew.info.
Author: Stu
Meet Brew.info's founder and head brewer, Stu. He began homebrewing as a hobby 13 years ago and has now made it a full-time career. He gives his advice, recipes, and reviews of equipment on Brew.info in an effort to encourage others to experience the satisfaction of homebrewing beer. You can find him trying out new breweries and beers, or unwinding at home with a pint of his most recent creation, when he isn't busy brewing or writing about beer. Cheers!


